Your Cart is Empty
Pictar By Adorama

Numerous
reasons can lead to that problem, let's cover the most frequent ones:
1.
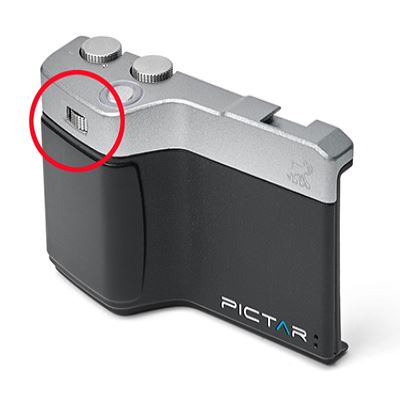
Maybe the battery of the Pictar is dead.
If
the blue light indicator does not turn on while pressing any button - then the
battery should be replaced for the grip of charged for the stick. If it does turn on - try the next step.
2.
Pictar is working on sound waves. Sometimes, there are background apps that are
using the microphone of your smartphone and can disturb the Pictar's
functionality, or devices that are connected to your phone. Make sure to close
such applications and disconnect the devices (for instance - hearing aids that
connects to the phone).
Also,
check that your phone is not on "power saving mode" (can occur
automatically when the battery is low).
3. A
lot of time, when users are having issues with Pictar - it has to do with
permissions to the Pictar app.
Take
a look at the attached video, and make sure that the Pictar app has permissions
to your phone's:
1. Camera
2. Mic
3. Writing in camera folder
4.
Resetting Pictar can also help:
-
Delete Pictar app from your phone.
-
Remove Pictar’s battery. Wait for 2-3 minutes (important!)
-
Enter the app store and download Pictar app again.
-
Insert Pictar’s battery back to its place. Make sure it’s fitted
correctly.
- Turn on the app.
We
guarantee the quality of all Pictar products and they are all warranted against
defects in materials and workmanship for a period of two (2) years from the
date of original purchase.
In
order to claim your warranty, please e-mail us to info@pictarworld.com
with the following information:
1.
Proof of purchase (receipt / order
number)
2.
Image of your product, showing the
problem you've described.
Please
e-mail us to info@pictarworld.com with the following information:
1.
Proof of purchase (receipt / order
number)
2.
Reason for returning / exchanging
See the following compatibility list for each product:
Pictar Smart Grip Compatibility
Pictar Smart Selfie Stick Compatibility
Each bag / cover can accommodate different size of camera & lens combination. Make sure to check the internal size of the bag / size of cover before you buy - and see if it fits your needs. You can find the information under the 'Specs' tab in the product page.
Each strap can carry a certain amount of weight - make sure to check that the strap is suitable for your camera & lens combination. Max carrying weight is indicated in the 'Specs' tab in the product's page.
Pictar Smart Grip Compatibility
Pictar Smart Selfie Stick Compatibility


Pressing this button all the way takes a photo or starts video recording. But like a DSLR, it’s electronically
calibrated to provide maximum sensitivity.
A ‘half press’ of the button locks focus and exposure, allowing you complete control over your desired
composition. Then once your framing is right, continue through to a full press to take your picture.
Tip:Pictar’s shutter button allows you to take pictures with gloves on – perfect for extreme sports or in cold weather.
The zoom ring is located below the shutter release button, so now you don't need to pinch-and-zoom. You can use just one hand to turn the zoom ring to zoom in or out.
Clicking the zoom ring switches between the phone’s front and back camera – ideal for ‘selfie’ shots.
Advanced users can also re-program the zoom ring to control other settings; this can be done in the menu section (please click on this symbol). If you re-program it, you will need to use the conventional pinch-and-zoom method on your phone's screen.
Tip: Shooting one-handed in selfie mode? Click the zoom button to select the front-facing camera, then turn the zoom ring to get the perfect composition.

Is your picture looking too dark or too bright? Turning this wheel lets you change the brightness of your picture before shooting. Just like on a DSLR, the wheel changes exposure in 1/3 aperture steps for precise control, as displayed on the bottom of the iPhone screen.
Tip: In manual mode, the exposure compensation wheel allows control of ISO values. 


The smart wheel controls the 9 pre-set modes to adjust the iPhone camera. The wheel can also be re-programmed to suit individual needs, but by default, just turning the wheel changes between:
A – Auto mode - ideal for beginners.
Filter mode – for applying different looks to your pictures.
Selfie mode – to enable the rear-facing camera.
Video mode – for shooting movies.
Macro mode – for taking close-up pictures.
Sports mode – for capturing action scenes.
M - Manual mode, total control of shutter speed and ISO, for advanced users.
S – Shutter priority, for advanced users.
ISO – ISO priority, for advanced users.

The right side of the phone screen has a "Virtual Wheel" which allows you to alter different controls like flash modes, shutter speed, ISO and more. Just use your finger to select the different settings.
Switching between modes is done with the Smart Wheel.
The Virtual Wheel icons can by hidden by swiping them right. Swiping left with your finger, from the very right side of the screen, makes them appear again. A small blue arrow indicates where to swipe.